Before you attempt an oval shape, you should know how to chain (ch), double crochet(dc), and work in the round.
You will need yarn and the appropriate (or one size smaller) crochet hook. See TIP below.
TIP
To avoid holes in your oval, be sure to use a smaller hook for the yarn. In this tutorial, I have used a larger hook to emphasise the stitches.
Crocheting an oval starts with a foundation chain. You crochet around the foundation chain, first along the top, then rotate the chain to work around the bottom to complete the round.
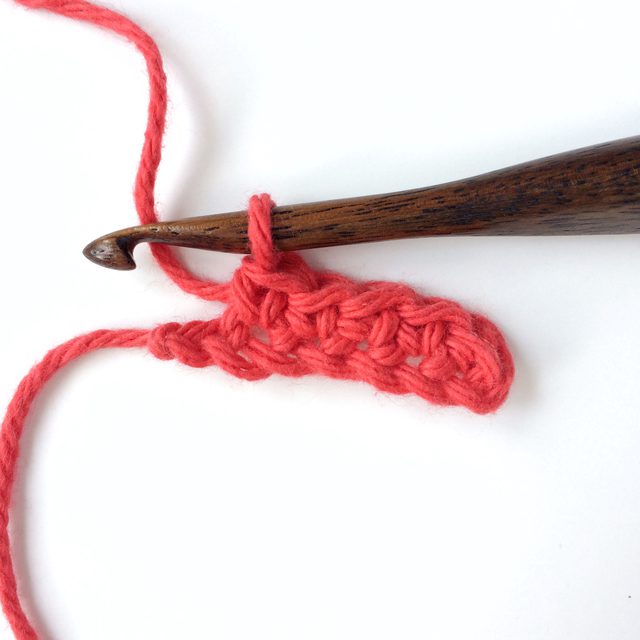
Step 1
Begin by chaining a number of stitches (sts). The number chained determines the size of your oval. For this tutorial, I have chained seven. For a bag you will want to chain a lot more, depending on the thickness of the yarn and the size of the bag you want to make.
 |
| Step 1. (Image: Makenzie Pearson) |
Step 2
Round 1: Double crochet (dc) in the second chain (ch) from the hook, then dc 4.
 |
| Step 2. (Image: Makenzie Pearson) |
Step 3
Crochet 3 dc in the last chain. Now rotate the work since you'll be working along the bottom of the foundation chain.
 |
| Step 3. (Image: Makenzie Pearson) |
Step 4
Complete dc, 2 dc in the last chain at the position of the first dc of the previous round. Your first round is complete -- you now have 3 double crochets on each end separated by 4 on each side, for a total of 14 stitches.
 |
| Step 4. (Image: Makenzie Pearson) |
Step 5
Round 2: Crochet 2 dc in the first stitch of the previous round; dc 4, 2 dc in each of the next three stitches, dc 4, 2 dc in the next 2 stitches. This now completes round 2 for a total of 20 sts.
 |
| Step 5. (Image: Makenzie Pearson) |
You now have created a base for your oval. To continue and make the oval larger, follow the guidelines: Increase 3 stitches on each end while maintaining your straight-edge stitches. As you increase on each end, space out the increases as evenly as possible to keep the rounded ends looking even.
If you're making a bag or basket, once you're ready to start the sides, stop making any increases and it will start to go upwards. To make a clean edge at the separation between the base and the sides, crochet into the BACK of the stitch on the next round only.


Comments
Post a Comment